


Sunday, 10 November 2024
How to modify 10x12 storage shed plans for your space

So, you're finally ready to tackle that mountain of stuff in your garage or basement. A shed, a glorious, weather-proof haven for all those "things you might need someday," is calling your name. But hold on! Before you start hammering and sawing, let's chat about customizing those pre-made 10x12 shed plans to fit your needs and space perfectly.
First things first: Know your space.
Imagine your dream shed. Picture it: a sprawling, organized sanctuary for your tools, bikes, lawnmower, and that vintage record collection you've been hoarding. Now, take a step back and take stock of the actual space you have.
1. The Basics: Where will it live?
The footprint: The shed's location dictates how much space you have to play with. Measure carefully! Do you have a corner to utilize? Will it need to fit between two trees? Consider walkways, utilities, and any other obstacles that might limit its size.
The foundation: Concrete is the gold standard, providing a solid, long-lasting base. But, if your budget is tight, gravel or even a simple wooden platform might work.
The slope: A slight slope for drainage is a must. If the area is flat, you might need to adjust the foundation height slightly.
The view: Will you want to gaze out at the garden from a window? Or maybe you prefer the shed to blend in with the surrounding greenery?
2. The Shape of Things: Beyond the 10x12 box
Go smaller or bigger: Maybe a 9x12 or 8x10 shed better suits your needs? Or, if you need to conquer an even bigger beast, think about extending the shed to a 10x14 or even a 12x14.
The roof: A classic gable roof is budget-friendly and easy to build. But if you need extra headroom, consider a steeper pitch or a more modern shed roof design.
The walls: Do you need extra ventilation for certain items? A few more windows, or maybe a louvered door, could make a big difference.
3. The Inside Scoop: Maximize your storage potential
Shelves: The holy grail of storage! Don't be afraid to go vertical - shelves maximize your floor space. Think about what you need to store and plan the shelf height accordingly.
Hooks and racks: A must-have for hanging tools, bikes, and other items. Consider using different sizes and materials based on what you'll be storing.
Workbenches and cabinets: If you plan to use the shed as a workshop, a sturdy workbench and some cabinetry for supplies is a great investment.
Insulation: Want to use your shed year-round? Adding insulation will make it more comfortable and energy-efficient.
4. The Finishing Touches: Personalize your shed
The door: A double door is great for moving larger items, while a single door might be more space-efficient. Consider the direction the door swings, so you don't end up blocking a path.
The windows: Windows add natural light and ventilation. They can be simple or decorative, depending on your style.
The paint: A fresh coat of paint not only adds visual appeal but also protects the wood. Choose a color that complements your home and garden.
Lighting: Adequate lighting is essential for working safely and efficiently. Consider LED fixtures for energy efficiency and longevity.
5. The Building Process: From plans to reality
Don't be afraid to modify: The shed plans you purchased are a good starting point, but feel free to adjust them to fit your specific needs and preferences.
Get professional help if needed: If you're not comfortable with carpentry, don't hesitate to hire a contractor to help.
Plan for safety: Always wear safety glasses and gloves when working with power tools.
A Few Words of Wisdom
Think about the future: Will you need to move your shed in the future? If so, choose a foundation that can be easily disassembled.
Don't forget the details: Things like weather stripping, flashing, and proper drainage can make a big difference in the long run.
Enjoy the process: Building a shed is a rewarding experience. Take your time, enjoy the process, and be proud of your creation!
The Journey Begins
Now, armed with this knowledge, you're ready to tackle your shed project. Whether you're a seasoned DIYer or a novice woodworker, customizing your 10x12 shed plans is a fun and rewarding way to create a storage solution that meets your specific needs. So, let's get building! Remember, the shed is just the beginning. Get creative, have fun, and enjoy the journey.
Diy plans for a 12x20 shed with ample storage

Alright, so you're thinking about building a shed. A 12x20 shed, huh? That's a pretty good size! You'll have plenty of room for all your tools, lawn equipment, maybe even a little workshop space. But where do you even begin? Don't worry, I've got you covered.
First things first, you'll need a plan. Think about what you'll be storing in your shed. Are you a gardener with a ton of tools and pots? Maybe you're a woodworker looking for a place to set up your saws and sanders? Maybe you're just looking for a place to stash all the stuff you've been meaning to organize for the last five years.
Here's how I'd tackle the planning:
1. Draw it out: Grab a piece of paper and sketch out a basic floor plan. Decide how much space you need for storage, a workbench, and maybe even a small seating area if you want a cozy corner for your projects.
2. Think vertical: Don't forget about going up! A 12x20 shed can have a surprising amount of storage space if you maximize the vertical area. Consider building shelves, cabinets, or even a loft area for extra storage.
3. Doors and windows: Think about where you want your doors and windows for easy access and ventilation.
4. Material considerations: Will you be using wood, metal, or a combination of both? Wood can be more affordable but requires more maintenance. Metal is more durable but can be more expensive.
Now that you've got a plan, let's talk about the materials:
Foundation: A solid foundation is crucial for a sturdy shed. You have a few options:
Concrete slab: Durable and long-lasting, but can be expensive and require skilled labor.
Pressure-treated wood skids: A more affordable option that's relatively easy to build.
Gravel base: The simplest and most cost-effective, but might not be as stable as concrete or wood skids.
Framing: Pressure-treated lumber is a good choice for the base of the shed. For the walls and roof, standard framing lumber will work just fine. You can use 2x4s or 2x6s, depending on the size of the shed and the amount of snow load you expect.
Sheathing: OSB (oriented strand board) is the most common choice for sheathing, but plywood is also an option. Make sure to use a moisture-resistant type for the exterior sheathing.
Siding: There are tons of options for siding, from traditional wood to vinyl, metal, or even fiber cement. Choose what works best for your style and budget.
Roofing: Asphalt shingles are the most popular and affordable option for shed roofing. Metal roofing is also a great choice for durability and longevity.
Building the shed:
Foundation: Once your foundation is in place, you can start building the frame.
Framing: Build the walls and roof frame using your chosen lumber. Make sure everything is plumb and square for a stable shed.
Sheathing: Attach the sheathing to the frame.
Siding: Install your siding on the exterior of the shed.
Roofing: Install the roofing material on the roof frame.
Doors and windows: Cut and install your doors and windows.
Interior finishing: Add the finishing touches like insulation, drywall, paint, and flooring.
Tips and tricks:
Pre-cut your lumber: This will save you a ton of time and frustration. Most lumberyards can pre-cut everything for you for a small fee.
Use a level: A level is your best friend when building a shed. Make sure everything is plumb and square, especially the walls and roof.
Don't be afraid to ask for help: If you're not comfortable with any part of the process, don't be afraid to ask a friend or family member for help.
Safety first: Wear safety glasses, gloves, and ear protection when working with power tools.
Enjoy the process: Building a shed is a fun and rewarding project. Take your time and enjoy the process of creating something with your own hands.
Remember: This is just a basic overview of the steps involved in building a 12x20 shed. There are many different ways to do it, and there are plenty of resources available online and at your local hardware store. Do your research, plan ahead, and have fun!
Bonus:
Add a little personality: You don't have to limit yourself to basic siding and roofing. You can add some personality to your shed by adding a decorative door, a cute window box, or even some colorful trim.
Think about the future: Will you need to add electrical outlets or plumbing in the future? Plan ahead and install these things while you're building the shed.
Take a break and admire your work: Building a shed is a lot of work, but it's also incredibly rewarding. Take a moment to step back and admire what you've accomplished. You've built something with your own hands, and that's something to be proud of!
And don't forget to share pictures of your finished shed! I'd love to see what you create. Good luck!
Diy pole shed construction: tips for building cheap

Alright, so you're thinking about building a pole shed, huh? Good for you! You're about to embark on a project that's both rewarding and practical. But let's be real, building anything can be a bit pricey, especially these days. So, if you're looking to build a pole shed on a budget, you've come to the right place. I'm going to walk you through some tips to help you save some cash without sacrificing quality.
First things first, let's talk about the foundation. A concrete foundation is the gold standard, but it can also be the most expensive part. Before you start digging, consider these alternatives:
Gravel Pad: This is a super simple and cheap option. Just lay down a layer of gravel, compact it good, and you're set. This is a great choice for lighter sheds, but keep in mind it might not be the most durable solution.
Pier Foundation: This involves pouring concrete piers at strategic points. It's stronger than a gravel pad and less expensive than a full concrete slab. Just make sure your piers are properly placed to support the weight of your shed.
Used Concrete Blocks: If you're lucky, you might be able to score some used concrete blocks for a song. These can be a great way to create a durable foundation at a bargain. Just make sure they're in good condition and level them properly.
Now let's move on to the poles themselves. This is where you can really save some money if you're smart about it.
Used Lumber: Check out local lumber yards, construction sites, and even Craigslist for discounted or salvaged lumber. You can often find great deals on beams that are slightly damaged but still perfectly usable.
Pressure-Treated Wood: This is a must for any pole shed because it resists rot and insects. But, it can be pricey. See if you can find some deals on pressure-treated wood. You can also consider buying the lumber in bulk if you're planning on building more than one shed.
Alternatives to Wood: If you want to go even cheaper, think about using steel or concrete poles. These are more durable and require less maintenance, but they can be harder to work with.
Next up, the roof. This is another area where you can make significant savings. Here's how:
Metal Roofing: This is a no-brainer for pole sheds. It's durable, weatherproof, and incredibly affordable. Plus, it's easy to install. Just be sure to invest in quality screws that can withstand the elements.
Used Roofing: You can often find great deals on used metal roofing at salvage yards or even online. Just make sure it's in good condition and fits the size of your shed.
Low-Slope Roof: A low-slope roof can save you on materials and labor. It's not as aesthetically pleasing as a steeper roof, but it's functional and economical.
Now let's talk about the walls and doors:
Metal Siding: This is a very durable and affordable option for shed walls. You can find it in various colors and styles to match your taste.
Recycled Materials: Get creative and use recycled materials for your walls and doors. Old pallets can be repurposed into siding, and reclaimed doors can be found at salvage yards or online.
Simple Designs: Keep the design of your shed simple. The fewer cuts and angles, the easier it will be to build and the less material you'll need.
Finally, let's talk about the finishing touches:
DIY Labor: The most significant savings you can make on your pole shed is by doing as much of the work yourself as possible. If you're not comfortable with some aspects, consider enlisting the help of friends or family. A good team can work wonders!
Used Windows: Scrounge around and you might find some cheap windows at salvage yards or online. This can add some much-needed light and ventilation to your shed.
Here are a few more money-saving tips:
Plan Ahead: A well-thought-out plan will save you time, money, and materials. Take your time, measure twice, cut once.
Shop Around: Get multiple quotes from different suppliers before you buy materials. You might be surprised at the price differences.
Don't Be Afraid to Ask for Help: Reach out to family, friends, and even your local community for help. You'd be surprised how willing people are to lend a hand.
Building a pole shed is a great way to add valuable space to your property. But, it doesn't have to break the bank. By following these tips, you can build a functional and affordable shed that you can be proud of. Just remember to stay organized, be patient, and don't be afraid to get your hands dirty. You'll be surprised at what you can achieve with a little creativity and determination!
And remember, if you're new to construction, don't be afraid to seek help from a professional. They can provide valuable insights and guidance to ensure your shed is safe and well-built. Good luck with your project!
How to create the perfect 10x12 garden shed for your backyard

Alright, so you've finally decided to take the plunge and build that garden shed you've been dreaming about. Maybe you're tired of tripping over gardening tools in the garage, or maybe you're just ready for a dedicated space to putter around in. Whatever your motivation, a 10x12 shed is a fantastic choice - just the right size for most needs, and a great starting point for a project you can truly personalize.
First Things First: Planning is Key
Before you get carried away with visions of shelves stacked with perfectly organized gardening gear, let's lay some groundwork. Planning your shed is crucial to avoid costly mistakes down the line.
1. Location, Location, Location:
This isn't just a real estate phrase! Choosing the perfect spot for your shed is essential. Consider:
Sun and Shade: Do you want a bright and sunny space or something more shaded? Think about the best light for your needs, whether it's for plants, crafts, or just a cozy hangout.
Access and Drainage: Will you need to move heavy objects? Ensure easy access for your tools and equipment. And don't forget about drainage! You don't want your shed turning into a swamp after a downpour.
Utilities: Will you need electricity or water? Consider their proximity to your chosen spot and any necessary permits or connections.
2. Design Your Dream Shed:
Once you know where it's going, it's time to design! This is the fun part, so let your imagination run wild, but also consider practicality:
What will you store? Tools, gardening supplies, bikes, artwork? Your storage needs will dictate the interior design.
Do you need windows? Windows provide natural light and ventilation, but they also add to the cost and complexity of construction.
Want a loft? A loft can add extra storage space, but it requires a sturdy floor and proper ventilation.
How about a workbench? A workbench is a great addition for any shed, and you can make it a custom fit to your needs.
Think about the doors: Double doors are great for moving large items, but single doors can be more space-efficient.
3. Choosing Materials:
The material you choose for your shed will impact its lifespan, aesthetics, and price.
Wood: Classic and beautiful, but requires more maintenance.
Vinyl: Durable and low maintenance, but can be less visually appealing.
Metal: Strong and rust-resistant, but can be more expensive.
Consider your budget, your desired look, and the climate you live in when making this decision.
4. Get the Necessary Permits:
Before you start digging, check with your local building department. They may require you to obtain permits for building a shed, especially if it exceeds a certain size.
Now for the Fun Part: Building Your Shed
With your plan in place, it's time to get your hands dirty! Building a 10x12 shed isn't as daunting as it sounds, especially if you're a DIY enthusiast. Here's a basic breakdown:
1. Foundation:
Concrete: Most durable and provides a level base.
Pressure-treated wood: A cost-effective option, but requires proper treatment.
Poured concrete pads: Great for lighter sheds and smaller projects.
Choose the foundation that best suits your needs and your budget.
2. Framing:
Measure twice, cut once: Accuracy is key when building a shed. Use a level and measuring tape to ensure everything is square and plumb.
Framing lumber: Choose pressure-treated lumber for the base and walls to prevent rot.
Bracing: Add bracing to the walls and roof for added strength and stability.
3. Roofing:
Shingles: Popular and affordable, with various styles and colors.
Metal roofing: Durable and low-maintenance, but can be noisy in heavy rain.
Rubber roofing: Easy to install and lightweight, but may not be as aesthetically pleasing.
Choose a roofing material that matches your budget and aesthetic preferences.
4. Siding and Trim:
Choose your style: Siding can range from simple clapboard to more intricate designs.
Don't forget the trim: Trim can add detail and enhance the look of your shed.
Paint or stain: Protect and personalize your shed with a fresh coat of paint or stain.
5. Interior Finishing:
Flooring: Wood, concrete, or even tile can be used for flooring.
Shelving and Storage: Design your storage system to fit your needs.
Lighting and Ventilation: Ensure adequate lighting and ventilation for a comfortable and safe space.
6. Personal Touches:
This is where you really get to make your shed your own! Consider adding:
A cozy seating area: A comfy chair or bench is perfect for relaxing and enjoying the outdoors.
A mini-workshop: Set up a workbench and have a space for your hobbies and projects.
A small refrigerator: Store snacks and drinks for your outdoor adventures.
Tips for Success:
Take your time: Building a shed is a process, so don't rush it.
Don't be afraid to ask for help: If you're not comfortable with certain tasks, ask a friend or professional for assistance.
Invest in quality tools: Good tools will make the job easier and more efficient.
Have fun! Building your own shed is a rewarding experience, so enjoy the process.
Your Backyard Oasis Awaits!
With some careful planning and a little elbow grease, you can build the perfect 10x12 garden shed for your backyard. It's not just a storage space, it's a place for creativity, relaxation, and enjoyment. So, get out there, get building, and make your backyard dreams a reality!
Diy 8x12 shed plans: build it right, build it cheap

Hey there, DIYers! Tired of staring at that pile of garden tools in the corner of your garage? Wish you had a dedicated space for your lawnmower, bikes, or maybe even a little workshop? Building a shed can be the perfect solution, and guess what? You can do it yourself and save a ton of money in the process!
I'm talking about a trusty 8x12 shed. It's the perfect size for a whole lot of storage, without being overwhelming to build. And trust me, it’s a much more rewarding project than you think. Let's dive in, but first, a little disclaimer â€" building a shed isn’t a walk in the park, but it’s definitely achievable if you're willing to learn and put in the effort.
Planning is Key (and Your Budget's Best Friend):
Before you jump into building a shed, you've got to make a plan. Think of it as the roadmap for your project. First things first, you need to figure out your budget. You’ll need to factor in the cost of materials like lumber, roofing, siding, and windows (if you want them). Don't forget about tools, fasteners, and even permits, if needed.
Now, let's talk about the actual planning. You'll need to decide on a location for your shed. Make sure it's level and accessible â€" you don’t want to be lugging lumber through a muddy field, trust me! You'll also need to figure out the best foundation for your shed. A concrete slab is the most durable option, but it can be costly. A gravel foundation is more budget-friendly and relatively easy to build.
Choosing Your Materials: The Foundation of Your Project (and Your Wallet):
Now comes the fun part â€" picking out the materials! The key is to choose high-quality lumber, but without breaking the bank. Pressure-treated lumber is a must for the foundation and base plates, as it’s resistant to rot and decay. For the walls and roof, you can use standard framing lumber.
Don’t be afraid to ask for discounts at your local lumberyard! They might be willing to offer a deal on leftover or damaged boards that are still perfectly good for your project. And keep an eye out for sales!
Getting Down to Business: Time to Build!
Okay, now it's time to get your hands dirty. The first step is to build the foundation. If you’re using concrete, you’ll need to pour a slab. But for a gravel foundation, you'll need to excavate the area, lay down gravel, and compact it.
Next, you’ll build the floor joists and subfloor. This is where you’ll be using pressure-treated lumber. Make sure to use joist hangers for proper support and to keep everything level.
Time to build the walls! Start by cutting the studs to the correct height and assembling them into wall sections. You’ll want to add bracing for extra strength. Don’t forget about the door and window openings!
Raising the Roof: Reaching for the Sky!
Roofing is one of the more challenging parts of building a shed, but it’s totally doable. You'll need to cut and install rafters, and then you'll be ready for the roof sheathing. Make sure the rafters are properly secured to the walls, and use a level to make sure everything is even.
Once the sheathing is in place, you’re ready to put on the roofing material. Shingles are a popular choice, and they’re relatively easy to install. But if you're looking for a more modern look, you can opt for metal roofing.
Finishing Touches: Making Your Shed Shine!
The last step is to add the siding and trim. There are so many options for siding, from wood to vinyl to metal. Just choose what fits your style and budget. And don’t forget the trim! It adds a touch of elegance and helps protect the edges of your shed.
Finally, you can add windows and a door. Make sure to use weather stripping to keep out drafts and moisture. You can also paint or stain your shed to give it a personal touch.
The Joy of Completion (and a Job Well Done!):
Building a shed isn’t just about saving money. It’s about creating a functional space that you can personalize and enjoy. Seeing your shed come together piece by piece is incredibly rewarding. Plus, you’ll have the satisfaction of knowing you built something with your own two hands.
So, what are you waiting for? Grab your tools, gather your materials, and let’s get building! It’s time to turn that pile of tools into a beautifully organized and functional space. Remember, you got this!
Bonus Tips:
Don't rush! Take your time and make sure everything is done properly. You’ll be grateful in the long run.
Get help when you need it. Don't be afraid to ask friends or family for a hand with the heavy lifting or more complicated tasks.
Enjoy the process! Building a shed is a rewarding experience. Take your time, have fun, and be proud of your accomplishment.
Now, go out there and create your very own DIY shed masterpiece! And remember, if you ever need a little extra motivation or have any questions, you know where to find me! Happy building!
How to build a budget-friendly garden shed with simple plans

Alright, let's talk about building a budget-friendly garden shed. You know that feeling, right? You're looking at your overflowing garage, dreaming of a dedicated space for all your gardening tools, outdoor furniture, or maybe even a mini workshop. But then you look at the price of those pre-made sheds â€" yikes!
Don't worry, my friend. Building your own shed doesn't have to be a huge project that'll break the bank. With a little planning and some elbow grease, you can create a perfect little haven for your outdoor gear without emptying your wallet.
Step One: Planning Your Paradise
Before you even pick up a hammer, let's get those creative juices flowing. First, you need to decide what you want your shed to be.
What will you store in it? This will determine the size you need. Do you just want a small shed for tools, or are you envisioning a mini potting station? Think about the biggest item you'll be storing and then add some extra room for breathing space.
Where will you place it? Pick a spot with good drainage and make sure you have easy access. Don't forget to check local building codes â€" some cities require permits for sheds, so you don't want to get caught out.
What kind of look are you going for? Do you want a classic wooden shed or something a bit more modern? This will influence your material choices.
Step Two: The Blueprint (Or Lack Thereof)
Now, you can either find free shed plans online, or you can sketch out your own. Honestly, you don't need anything too fancy. A basic rectangle with a gable roof is easy to work with. If you're feeling adventurous, you can add a window or a door on the side. Don't be afraid to get creative!
Step Three: Gather Your Materials
Time for the fun part - shopping! Here's where you can really stretch your budget.
Framing: Pressure-treated lumber is essential for the base to keep it from rotting. You can save money by using standard 2x4s for the walls and roof.
Sheathing: Plywood is the cheapest option. Don't worry about fancy stuff, just make sure it's smooth.
Roofing: Asphalt shingles are budget-friendly and easy to install.
Siding: You can use regular plywood or even corrugated metal if you want a more rustic look.
Doors and Windows: These are often the most expensive parts. You can save money by looking for used doors and windows on websites like Craigslist or Facebook Marketplace.
Step Four: Building Your Dream
Now it's time to get your hands dirty. Don't worry if you're not a seasoned builder - this is a great project for learning the basics.
Foundation: Start with a solid foundation. You can use concrete blocks, a gravel base, or even just a layer of treated wood.
Framing: This is the backbone of your shed. Follow your plan carefully and make sure everything is square.
Sheathing: This adds structure and creates a smooth surface for the siding.
Roofing: This part might seem daunting, but it's not as hard as it looks. There are tons of videos online that can help you through the process.
Siding and Trim: This is where you can add your personal touch. You can paint, stain, or even cover the siding with decorative panels.
Doors and Windows: Measure carefully and install them securely.
Step Five: The Finishing Touches
Now for the fun stuff!
Paint or stain: This will protect your shed and make it look amazing.
Interior: You can use paint, wallpaper, or even just leave the plywood as it is.
Storage solutions: Think about how you want to organize your space. Shelving, hooks, and pegboards can make a huge difference.
Budget-Friendly Tips
Ask for help: Don't be afraid to enlist help from friends or family. Building a shed is a lot easier with a few extra hands.
Shop around: Compare prices from different lumberyards and hardware stores. You might be surprised at the savings you can find.
Use salvaged materials: Check out local demolition sites or construction sites for free or cheap building supplies.
Don't be afraid to get creative: You don't have to follow a plan to the letter. Use your imagination and come up with your own solutions.
The End Result
Building your own garden shed can be a rewarding and fun experience. You'll have a place to store all your outdoor essentials, and you'll have saved a ton of money in the process. Remember, the key is to plan carefully, shop smart, and don't be afraid to get your hands dirty. So, what are you waiting for? Get out there and start building!
Saturday, 9 November 2024
How to build a firewood storage shed with ventilation for dry wood
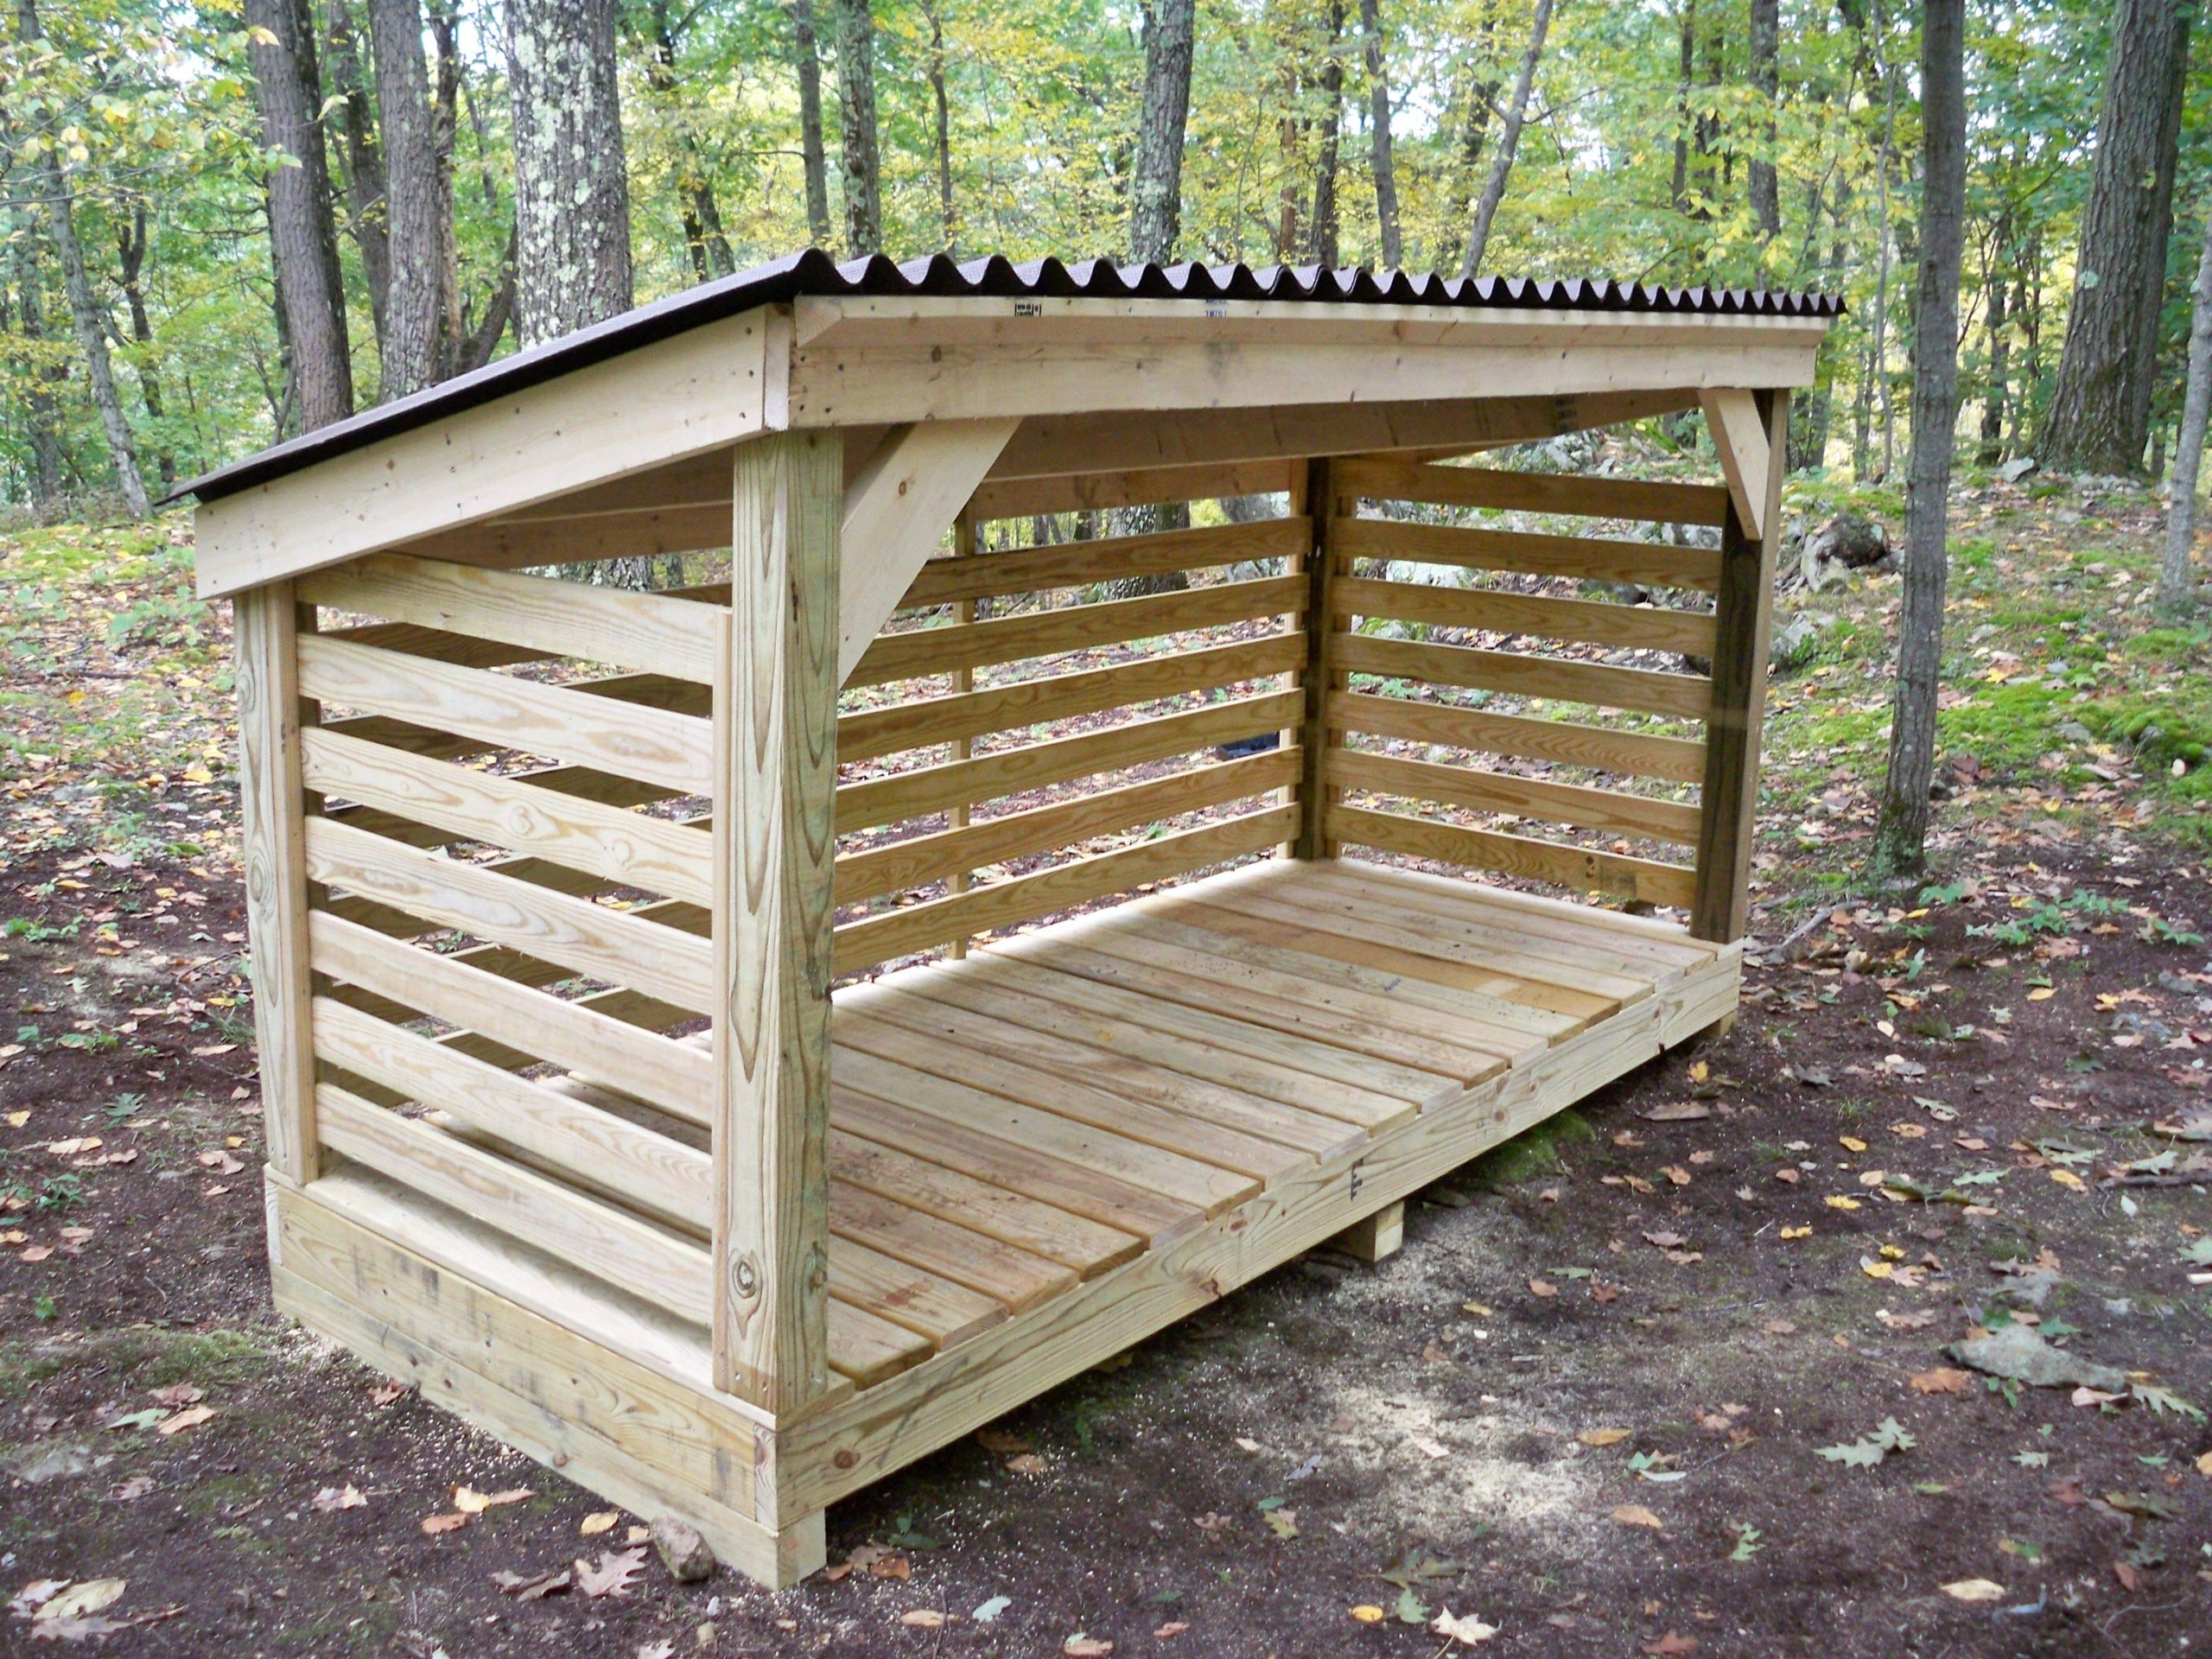
Alright, so you’ve got a decent stash of firewood, but it's sitting out in the open, getting rained on and looking like a soggy mess. You know the drill, right? Damp wood won't burn well, it'll smoke like crazy, and you'll be cursing the day you decided to try and make a fire.
Fear not, fellow fire-starter! We're about to embark on a journey to build a firewood storage shed that'll keep your wood dry, happy, and ready to roar.
The Blueprint: Choosing the Right Design
First things first, let’s talk about what kind of shed you need. Think about the size of your wood pile and the space you have available. A simple, rectangular shed is often the most practical, but if you're a wood-hoarding extraordinaire, you might want to go for something larger with multiple compartments.
Here's a breakdown of common designs:
The Basic Rectangular Box: This is your classic shed. Easy to build, affordable, and can be scaled up or down to suit your needs.
The L-Shaped Design: Perfect for tucking into a corner and maximizing space. The "L" shape offers a little extra room for storing tools or even a small workbench.
The Split-Level Shed: This design is ideal if you want to store different sizes of wood. The upper level can be used for smaller pieces, while the lower level can accommodate longer logs.
Building the Foundation: A Solid Base for Success
Your shed needs a strong foundation to stand the test of time. Here are a few options:
Concrete Slab: This is the most durable option but can be a bit more expensive. A concrete slab will provide a stable base for your shed and will help prevent moisture from wicking up from the ground.
Pressure-Treated Skids: A more budget-friendly approach, pressure-treated skids will elevate your shed slightly, providing some airflow beneath.
Concrete Blocks: A simple and cost-effective choice, concrete blocks create a sturdy foundation and can be easily laid out in a rectangular pattern.
Framing Up: The Skeleton of Your Shed
Now we're getting into the meat of it! The framing is what gives your shed its shape and structure. You'll need some lumber, specifically treated lumber for the foundation, and standard framing lumber for the walls and roof.
Wall Framing: Use 2x4s or 2x6s to construct your walls, creating a sturdy framework for your siding. Don't forget about door and window openings!
Roof Framing: Choose rafters for your roof, either pre-cut or build your own using 2x4s or 2x6s. You'll also need a roof truss or a simple gable frame to support the roof sheathing.
Roofing: Keeping Your Wood High and Dry
Now let's get that roof on! Your choice of roofing material is important, as it needs to protect your firewood from the elements.
Metal Roofing: Durable, low-maintenance, and reflects heat, making it a great choice for hot climates.
Shingles: A classic choice that offers good protection and a variety of styles to suit your preferences.
Asphalt Roofing: Cost-effective and easy to install, but may need replacing more frequently than other options.
Siding: The Outer Shell of Your Haven
Time to give your shed some personality! There are many siding options to choose from, depending on your budget and style.
Wood Siding: A natural and classic choice, wood siding can be painted or stained to match your home's exterior.
Vinyl Siding: Low-maintenance, durable, and comes in a wide array of colors.
Fiber Cement Siding: A more durable option that is resistant to fire, rot, and insects.
Ventilation: The Key to Dry Wood
Now, here's where we really make this shed shine! Adequate ventilation is essential to keep your wood dry and prevent mold and mildew.
Air Vents: Install vents on the walls or roof to allow air to circulate freely through the shed.
Roof Vents: Place vents on the roof to draw out warm, moist air.
Openings: Consider leaving gaps in the walls or the base of the shed for additional airflow.
Finishing Touches: The Little Things That Make a Difference
It's time to put the finishing touches on your firewood haven:
Floor: A simple concrete floor is an excellent choice for a firewood shed. However, if you're feeling fancy, you could use treated lumber or even composite decking.
Door: A solid wooden door will keep your wood secure and protect it from the elements.
Shelves or Racks: Consider adding shelves or racks to organize different sizes of wood and make it easier to access.
Lighting: A light fixture or solar-powered lights will make it easier to find your firewood after dark.
The Grand Finale: Putting It All Together
And there you have it â€" your very own firewood storage shed! It's a project that takes time and effort, but the benefits are definitely worth it. You'll have a dry, organized wood supply that's ready to fuel your next campfire or fireplace.
Bonus Tip: To give your wood an extra boost of dryness, consider adding a small fan inside the shed to circulate air and speed up the drying process.
Happy building, and happy fires!