Wednesday, 6 November 2024
A practical diy guide for lean-to storage shed

Alright, folks, let’s get this party started! You’ve got stuff. Lots of stuff. And your garage is overflowing. Sound familiar? Well, it’s time to take control of your clutter and build a lean-to storage shed!
This guide is for you, the weekend warrior, the "I can do it myself" kind of person. We’ll walk through the entire process, from planning and materials to construction and finishing touches. Don't worry, we'll keep things simple and clear.
### Step One: Planning and Design
Before you dive into the woodpile, take a minute to plan your lean-to shed. Consider these questions:
Size: How much stuff do you need to store? Measure the items and give yourself some wiggle room. Remember, a bigger shed is always better!
Location: Where on your property will the shed live? Choose a spot with good drainage, easy access, and some sun if you plan to use the shed for hobbies.
Materials: Will you be using treated lumber for longevity or opting for a more budget-friendly option? Decide on the materials that fit your budget and project scope.
Roof Style: Lean-to roofs are simple, and you can choose a single pitch or a more gradual slope. Think about the amount of snow you get and how you want the shed to blend in with your existing structures.
Features: Do you want windows for light? A door on the side for extra access? Think about the features that will make your shed the ultimate storage solution.
### Step Two: Gather Your Supplies
Once you’ve got the blueprint in your head, it’s time to gather the materials. Here’s a general list, but always double-check your measurements and adjust accordingly:
Framing Lumber: Choose pressure-treated lumber for the base and bottom plates to resist rot. You'll need 2x4s, 2x6s, or 2x8s depending on the size of your shed.
Sheathing: Plywood or OSB (oriented strand board) will provide a solid base for the roof and walls.
Roofing Materials: Asphalt shingles, metal roofing, or even recycled plastic shingles offer various styles and price points.
Siding: Choose your favorite siding material â€" vinyl, wood, or even corrugated metal.
Door and Window Materials: You can buy pre-made doors and windows or create your own with some basic woodworking skills.
Fasteners: Galvanized nails or screws are the best choice for outdoor projects.
Flashing: This will help prevent water from leaking around windows and doors.
Caulking: Seal any cracks or gaps for a watertight shed.
Paint or Stain: Give your shed a finishing touch with a coat of paint or stain.
Pro Tip: Check with your local building department for any required permits or inspections.
### Step Three: Build the Foundation
A solid foundation is crucial for a long-lasting shed. You have several options:
Concrete Slab: This is the most durable option, but it requires some expertise and specialized equipment.
Concrete Blocks: More affordable than a slab, concrete blocks offer a sturdy base.
Pressure-Treated Lumber: Create a simple frame with treated 4x4 posts sunk into the ground.
Gravel Base: This is the easiest and most budget-friendly option, but it may not be as stable as other foundations.
Remember: Ensure your foundation is level and can support the weight of your shed.
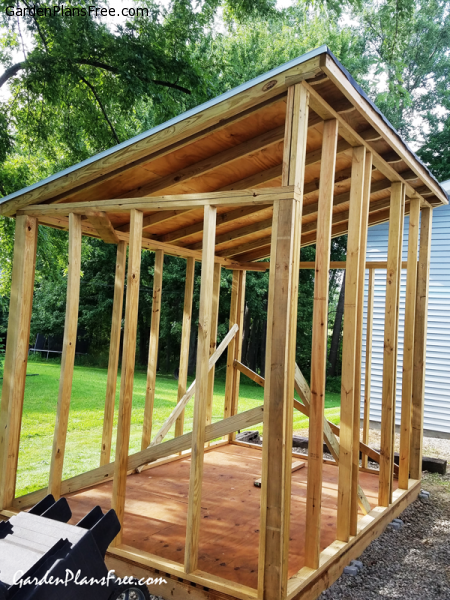
### Step Four: Frame the Walls and Roof
Now the fun begins! Use your framing lumber to construct the walls and roof:
Walls: Build two side walls and a back wall. You can use pre-cut studs or cut them yourself. Make sure the walls are plumb and square.
Roof: Use 2x4s or 2x6s for the rafters. Attach them to the wall plates and create a slope for water runoff.
Sheathing: Attach sheathing to the walls and roof for a solid surface for your siding and roofing.
Important Tip: Use a level and a square to ensure your walls and roof are straight and sturdy. Double-check your measurements!
### Step Five: Install the Roof and Siding
With the frame complete, it’s time to dress up the shed:
Roofing: Install your chosen roofing material according to the manufacturer's instructions. Remember to install flashing around the edges and chimney vents (if you have one).
Siding: Attach your siding material to the walls. You can use nails, screws, or staples depending on the type of siding.
Door and Window Installation: Cut openings for your door and windows, then carefully install them using flashing and caulking for a watertight seal.
Remember: Take your time and pay attention to the details. A well-installed roof and siding will protect your belongings for years to come.
### Step Six: Finishing Touches
The final steps add personality and functionality:
Paint or Stain: Give your shed a fresh coat of paint or stain for a polished look.
Shelving and Storage: Install shelves, hooks, or other storage solutions inside the shed to maximize space.
Lighting: Add lighting for working or accessing your belongings after dark.
Ventilation: Install vents for proper airflow and prevent moisture buildup.
Pro Tip: Consider adding a weatherproof floor covering to protect your belongings from spills and moisture.
### Step Seven: Enjoy Your New Storage Solution!
Congratulations! You’ve successfully built your own lean-to storage shed. Now, relax, enjoy your newfound organization, and relish the feeling of accomplishment.
Remember, building a shed is a great way to learn new skills, save money, and have some fun along the way.
Don't forget: If you're feeling overwhelmed, don't hesitate to ask for help! Friends, family, or even a local handyman can assist you with the more challenging tasks.
Happy building!


No comments:
Post a Comment
Note: only a member of this blog may post a comment.